
 Blinkie Tutorial
Blinkie Tutorial
Well, since I’ve got “Blinkies on the brain” this week, I’ve decided to give you all a tutorial on making blinkies with PSE (I’m using PSE7). This is also my first time to write a tutorial, so bare with me. I’ll try to keep it as short as possible. If you have any questions that aren’t answered here, please feel free to send me a through comments. …Let’s get started…
First you need to have a pretty good idea of the look you want to achieve. With any animated graphic it’s good to remember that to achieve a nice smooth flow your layers must change just slightly each time, and you will have many, many layers.
The standard size for blinkies is 150x50 px, but I like to create it in a larger size that is easier to see and work with and then reduce the size when I’m finished.
To start we’ll need a 300x100 px, 300 ppi blank file. Open all of the elements or papers that you will be using so that they are available in your tray. Create your first layer of the blinkie by adding a background and elements just as you would when you create a lei-out. Add any styles and shadows to the elements now. I like to rename every layer so that it is easier to find when you need to move something later. Try to visualize how things will flow.

When you have it the way you want it, select all of the layers in this first set. This is very important: DO NOT MERGE THE LAYERS. Duplicate the layers (as shown below).

It can get kind of confusing with all of the layers so labeling each item definitely helps. You’ll notice that the Scrapable, the flowers, and the little crab have moved just slightly in this set of layers. Keep duplicating and moving items slightly and adding layers until everything you want it to do or say is included.
When you are finished creating– and this is soooo important – SAVE YOUR BLINKIE BEFORE YOU MERGE THE LAYER SETS. I usually give it a file name like: Scrapable_blinkie_Master. If you don’t save it now you won’t be able to go back and change things after it’s merged. Below is a screen shot to show you the merging process.

Now we’re ready to merge our layer sets. Use shift+click to select each set of layers, right click on any highlighted item and when the pop up window appears select “Merge Layers”. Be careful to only select the layers in that set. Continue merging until all of the layer sets are merged. I’ve had as many as 90 layers after merging the sets. These are time consuming little boogers.
Now your layers pallet should look something like this:

Those are merged layer sets. Now we’ll just call them layers.
Now we’re ready to resize our image. Follow the screen shot below

Click on “Image” on the top left side of your screen. From the dropdown menu choose “Resize”, then choose “Image Size”.

Now in this dropdown menu, change the width to 150 pixels, the height should change automatically to 50. Click OK.
Now it gets good. You’ll be able to see the fruit of your labor in this next step.
Click on “File” in the top left side of the screen. Now select “Save for Web” and you should see a window like the one below:

In this window, we’ll start at the top and work our way down.
Preset: GIF 128 No Dither (you can choose others here to reduce the size but it will also reduce the color)
Be sure that GIF is selected for the file type and “Selective”
Transparency must be checked
ANIMATE must be checked
You shouldn’t need to mess with anything in the “Image Size” boxes. Skip down to Animation.
In the “Animation” box you have a choice on how fast the blinkie will flash through the layers. I normally choose 0.2 but if you want it to move slower try 0.5.
Now to see what your blinkie will look like online, click the little globe on the bottom, where it says “Preview In”. this should open a web page for you to view your blinkie. Watch it a few times to see if it’s working properly. Now, exit out of the web and you’ll be back at the page above. If your blinkie is perfect, click on OK and it will ask you to name it and to choose a location to save it, then you can upload it to a photo sharing site and start using it.
If the blinkie is not what you wanted, choose “Cancel”. Back in PSE you will want to close the merged blinkie WITHOUT saving it. Now, reopen it. If you saved it before you merged the layer sets, you will be able to make the changes you need to in order to get it right. Then just go through the steps again until it’s what you want.
I hope this tutorial has been helpful. Boy, you thought I was gonna keep it short! : )
By the way, I’d love to see your blinkies when you finish them.
Have a great day!


1 comment:
Hi Laurinda,
Just stumbled upon your blog through Digiscrapdepot and love your designs.
Unfortunately, the QP's I was interested in are no longer workable links. I went to your store and couldn't find them there.
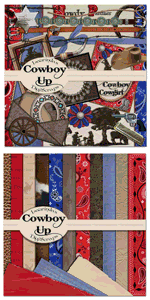
I was really interested in the Cowboy pages for my grandson and the Christmas pages.
Could you please direct me to the QPs if you still have them.
Thanks so much, Diane
cliane@bellsouth.net
Post a Comment